All lines
Above-ground

Drip irrigation

Underground

Online catalogue

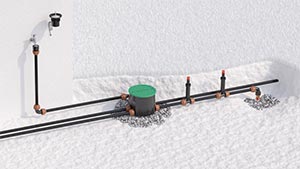
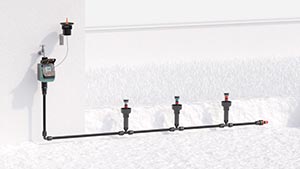
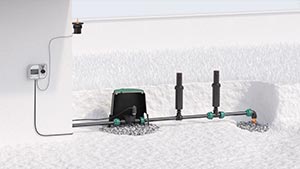
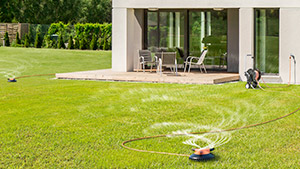
The Hydro-4 is suitable for gardens up to 700 m². Install the valve box outside, buried at ground level (1-2) or resting on the surface (3). If installed below ground, lay draining material and a protective sheet in the hole before putting in the Hydro-4, to make sure that soil and any other debris cannot get into the product. Remove the sheet and the line closure plugs only when the system is completed. Do not place it in areas which are frequently walked over or passed over by mechanical means (eg. ride-on lawn mowers).
Only use filtered water. Water line flow rates: 2,5 bar 25 l/min.
* parts not supplied, to be purchased separately.
1) 3/4” threaded male tap water inlet connector
2) Valve box
3) Liquid Crystal Display
4) Back button
5) Enter button
6) Forward button
7) Cover fastening screw
8) Cover fastening washer and OR
9) Valve box cover
10) Line closing plug gasket
11) Line closing plug
12) Transparent cover
Once the valve box has been positioned, make the hydraulic connections as indicated on the following pages: depending on requirements, 1/2”-5/8”-3/4” above-ground hoses or 16-20-25 mm below-ground polyethylene hoses can be connected to the valve box. Below each link is referred to the example above.
Before burying the system, check that it is working properly.
In order to operate the water timer requires two AAA (LR03)1.5V Alkaline batteries that must be replaced at the start of each season.
Unscrew the two screws on the valve box cover, remove them and remove the cover. Unscrew the plastic cover on the water timer and lift it up. Take out the water time.
Unscrew the battery compartment plug, take out the battery-holder, and if present, remove the drained batteries. Fit the new batteries in the holder, observing the correct polarity.
Replace the battery-holder into its housing and screw down the plug checking that the seal is correctly placed in its seat. Put the timer in position, screw on the transparent cover (A) with the seal firmly in place (B), close the valve box with the green cover and fix it in place using the screws and seals.
The timer controls up to 4 irrigation lines. Each line has two programmes, A and B, each independent from the other. In both programmes up to 4 daily start times can be set in a 24-hour span. Each start time begins a watering cycle on all 4 lines, making each of them work one after the other for the run time set, which can be from a minimum of 1 minute up to a maximum of 60 minutes.
Warning: a start time cannot be set for each individual line. Only the first start time is set. The other lines will come on one by one depending on the times selected for each of them. To set the other three start times, you need to add together the minutes entered for each line, plus one minute automatically calculated by the timer. Watering cycles continue in sequence (once line 1 is finished, line 2 starts and so forth).
1) Indicate the programmed start times (start time) for automatic watering
2) Indicates battery level
3) Indicates the line which is being programmed
4) Indicate which programmes (only A, only B, both A and B neither A nor B) are enabled
5) Indicates the page for testing and manual watering
6) Indicates that we are in change parameter mode
7) Shows start time pages
8) Indicate the time or, in the programming pages, the run time and start time of watering
9) Indicates that watering is in progress
10) Indicates the day of the week; in programming, it indicates the day of the week in which watering is required and with which of the two programmes
Only three keys let you set all the parameters.
The arrows let you scroll through the various pages in order to select the one desired.
The ENTER key lets you access the EDITING of the parameter displayed. When is pressed, OK appears in the bottom left display.
With OK, the arrows turn on and let you edit the value of the parameter displayed.
If a key is not pressed for approximately 5 minutes, the water timer automatically returns to the date and hour page, without confirming the changes in progress.
When the desired value is reached, exit from the changes by pressing the ENTER key, OK will disappear on the lower right part of the display.
It is now possible to go back to the page with the arrows.
The display provides information about all the programming pages in the order they appear: the arrows allow the user to scroll through the different pages. The ENTER key lets you access the EDITING of the parameter displayed.
Warning: Hydro-4 (code 90829) can only be set manually from the display and not from the RF remote control (this is only possible on Hydro-4 RF code 90839).
When the batteries are first fitted the display shows the first page current TIME/DAY, indicating as default 12:00 and S (Sunday).
By pressing ENTER, the message OK appears and the days of the week disappear.
Press the arrows to increase or decrease the current time. By holding down the key, the time progresses more quickly until the required time setting is reached.
To confirm the modified parameter press ENTER and move to the screen to set the current day.
Press the arrows to scroll through and select the current day. The days are shown as: S Sunday, M Monday, T Tuesday, W Wednesday, T Thursday, F Friday, S Saturday.
To confirm the modified parameter press ENTER and move to the screen to set the type of programme to use.
Press the arrows to enable the required programme: A, B, both programmes or set them to OFF.
To confirm the modified parameter pressENTER and return to the time screen.
The RUN TIME page allows the user to set a watering run time for programme A and programme B for each LINE. The watering cycle run time for each line can be set from 1 to 60 minutes.
From the RUN TIME page, press ENTER to enable modification, the symbol OK flashes indicating that the parameters displayed can be modified and require a setting confirmation.
Using the arrows changes the value displayed (by pressing and holding the keys, the value will change more quickly).
Press ENTER to confirm the set value.
By pressing the right arrow the user moves to the RUN TIME setting of the next line up to a maximum of 4 lines to form a WATERING CYCLE.
If a watering cycle does not include the use of a specific line, simply set the watering run time of that line to OFF.
The START TIME page allows the user to set up to start times per day for the WATERING CYCLE for programme A and 4 times for programme B.
From the START TIME page, press ENTER to enable modification of the START TIME 1, the symbol OK flashes indicating that the parameters displayed can be modified and require a setting confirmation. Using the arrows change the value displayed.
Press ENTER to confirm the set value.
If necessary, set the times of the next START TIMES 2, 3, 4 by pressing the right arrow and repeating the operations described above.
Warning: the timer automatically resets the 4 daily START TIMES for each programme A or B to prevent a watering cycle from starting before the previous one has been completed or from going beyond the 24 hours in the day. It is possible to overlap the times of the programme A and programme B watering cycles (if the system does not have a sufficient flow rate, this could have a negative impact on the quality of the watering).
With the weekly programming (WEEKLY SCHEDULE) the user selects the days of the week on which the set Watering cycles are activated.
From the WEEKLY SCHEDULE page, press ENTER, the symbol S flashes (Sunday).
Use the arrows to move to the desired day and press ENTER to select which programmes to start on that day (only A, only B, both A and B, neither A nor B). Press the ENTER button several times to enable or disable the daily programmes.
The days are shown as: S Sunday, M Monday, T Tuesday, W Wednesday, T Thursday, F Friday, S Saturday.
To exit use the arrows to move to EXIT; when it flashes, press ENTER.
The settings will be saved.
From the RAIN SENSOR page press ENTER, activates when the Rain Sensor RF activates/deactivates.
Press the right arrow to move the status from “NO” (sensor deactivated) to “YES” (sensor activated) and vice versa.
Confirm by pressing ENTER.
Recognition between the devices takes about 5-10 minutes.
Status of Rain Sensor RF:
symbol ON: Sensor EMPTY or not active for the water timer.
Symbol permanently on: Sensor FULL or active for the water timer. With the sensor FULL any watering programmes are interrupted and other programmes start automatically while the symbol remains active.
Symbol active and flashing: the water timer has not received any information from the Rain Sensor RF for more than 24 hours and is working independently from the sensor. Check the Rain Sensor RF installation and batteries.
Warning: the Hydro-4 can only be combined with the RF Rain Sensor (code 90831), not the wired Rain Sensor (code 90915).
By entering TEST mode, any automatic watering is stopped.
From the TEST page press ENTER. Use the arrows to select the solenoid valve to be activated (the number 1, 2, 3, 4 indicates which solenoid valve is selected).
Press ENTER to open the selected solenoid valve (when the valve is open the OK symbol flashes).
Manual irrigation is factory preset to run for 5 minutes, and is modifiable between minimum 1 minute and maximum 60 minutes.
If you want to stop it sooner, press ENTER. OFF appears on the display.
Move to the page where TEST is displayed with the symbols OK and EXIT flashing. Press ENTER to exit TEST/manual mode. Press the right arrow to go back to the page with the clock.
The display normally shows the current TIME/DAY screen; press ENTER to go into the time programming and press it twice more.
Press the arrows to enable the required programme A, B, both programmes or set them to OFF.
If programmes A and B are assigned on the same day, this could cause the simultaneous opening of the two lines: the system does not have a sufficient flow rate, this could have a negative impact on the quality of the watering.
Once the selection has been made, press ENTER to confirm enabling of the programmes displayed.
To fully reset the timer, press and hold the two arrow buttons together for at least 10 seconds, until 12:00 shows on the display. Then, completely reprogramme the water timer as described in the programming sections.
In winter or long periods of inactivity close the tap or the gate valve upstream.
Access the control unit and manually open all 4 lines in sequence to drain the water.
Remove the batteries.
Remove the water timer, store it in a dry area where the temperature does not fall below 3 °C.
Close both the transparent and the green covers firmly with screws and seals.
If the valves malfunction, clean the internal components thoroughly as shown in the mechanical parts disassembly/reassembly diagram shown below.